Saturday, November 26

Chopped Couscous Salad

Here's a relatively easy couscous salad to put together. Most of the prep is dicing things up. You can also easily modify this with what you have on hand. You could swap cannelloni beans with garbanzos, Israeli couscous for the traditional style or even orzo, and veggies can really be anything seasonal.

 My garden is still going (and yes, it's nearly December!) with cilantro, parsley and arugula so I grabbed a bit of each to chop up which adds a great herbal tone and contrast to the sharp vinaigrette dressing.

This is great on its own, over greens, or even with grilled chicken.
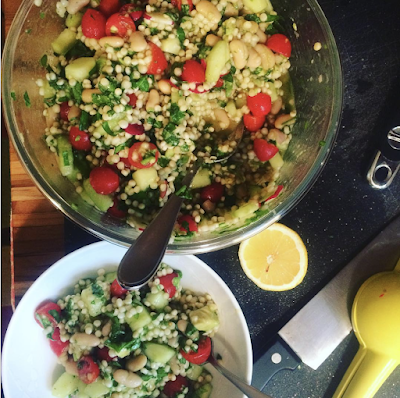
Chopped Couscous Salad

INGREDIENTS:
  • 1 8.8 oz bag or 1 cup couscous (I used the Israeli style as that's what I had on hand, but either will work), prepared following directions on box/bag/etc
  • 1-2 garlic cloves, grated (I like to use a microplane)
  • 1/2 to 1 whole shallot, minced (can swap with some red onion)
  • 1/2 cup olive oil
  • 1/8 cup cider vinegar (or swap with your favorite)
  • 1 TBPS honey
  • 1 TBSP pomegranate molasses (optional - can find it at Whole Foods near with the molasses/baking section)
  • 1/4-1/2 lemon, juiced
  • 1 cucumber, peeled, seeded, diced
  • 1-2 handfuls of cherry or grape tomatoes, cut in half
  • 5-6 radishes, sliced thin
  • 1-2 avocados, diced
  • 1 can cannelloni beans, rinsed and drained
  • 1 TBSP cumin
  • handful fresh cilantro, chopped
  • handful fresh parsley, chopped
  • handful fresh arugula, chopped
  • salt & pepper
METHOD:
1) Prepare couscous per package directions.
2) In a large bowl, prepare the dressing by mixing olive oil, vinegar, shallot, honey, pomegranate molasses (optional), and lemon juice together with a whisk. Add a couple pinches of salt and pepper to taste.
3) Add cucumber, tomatoes, radishes, avocados, beans, cumin, parsley, cilantro, and arugula. Stir to combine. 3) Stir in couscous and taste for seasoning. You might need to add more salt and pepper and lemon juice to your taste.
Makes 4-6 servings.

Saturday, May 28

Avocado & Chickpea Salad

Last night we needed a side to go with our burgers. Hubs suggested guacamole, but that wasn't as helpful but it did spark an idea to use the perfectly ripe avocados for a salad. I used up some "end of the week" produce and made up a dressing that was a mix between middle eastern and latin in flavor.

The result was quite tasty and can be good on a bed of lettuce like arugula. You can also easily modify it; add some diced bell pepper if you have it, radish, fresh corn, etc. Or turn it into more of a meal by adding some grilled chicken or serve it in a wrap with falafel. If you do give it a try, let me know what you think.

Avocado & Chickpea Salad

INGREDIENTS:
  • 1 15.5oz (438g) can chickpeas, drained and rinsed (can do 2 cans if you like)
  • 1-2 garlic cloves, grated (I like to use a microplane)
  • 1 scallion, cut in half and diced (could also use about 1/4 cup of finely diced red onion)
  • about a thumbnail size of jalapeno, finely diced (or more if you want more heat)
  • 1 cucumber, cut in half and sliced (you want half moons)
  • 1-2 handfuls cherry tomatoes (cut in half) or regular tomato, diced
  • 2-4 TBSP oil, enough to coat
  • 2 ripe avocados
  • 2-3 TBSP pomegranate molasses (you can find this at Whole Foods in the syrup area)
  • 2-3 tsp apple cider vinegar
  • squeeze of lemon juice (1/4-1/2 lemon - squeezed for juice)
  • 1 TBSP cumin
  • salt & pepper
  • 2 TBSP fresh cilantro, chopped (could substitute with parsley)
METHOD:
1) Combine everything in a bowl.
2) Stir gently to combine and make sure seasoning and dressing is evenly coating. Be careful to not mash the avocado up too much. But, it will break down a bit, which will add a creaminess to the dish.
Makes 4-6 servings.

Sunday, May 8

Lemon Meringue Cupcakes

I've had this recipe from King Arthur Flour bookmarked/pinned for a couple years, waiting for the right opportunity to make it. OMG, why did I wait? They are super tasty. I loved the lemon curd and the cake, which has buttermilk in it, is superb on its own. They do take a bit of time and a little finesse, but nothing extraordinary; although the results definitely are.

Lemon Meringue Cupcakes

INGREDIENTS:
For Cupcakes
  • 1 1/2 cups cake flour
  • 1 tsp baking powder
  • 1/4 tsp salt
  • 1/4 tsp baking soda
  • 2/3 cup sugar
  • 1/3 cup butter, room temperature
  • 1 large egg, room temperature
  • 1/2 tsp vanilla extract
  • 2/3 cup buttermilk
For Lemon Curd (Yield: a scant 2 cups)
  • zest of 1-2 lemons
  • 1 cup freshly squeezed lemon juice (about 4 large, juicy lemons)
  • 1 cup sugar
  • 1/2 cup (8 TBSP) butter, melted
  • 2 large eggs
For Meringue
  • 3 large egg whites
  • 1/4 tsp cream of tarter
  • 1/8 tsp salt
  • 6 TBSP sugar
METHOD:
1) Preheat the oven to 400°F and line a 12-cup cupcake or muffin pan with paper liners; spritz the liners lightly with cooking spray.
2) To make the cupcakes: Place the following in the bowl of your mixer: the cake flour blend, baking powder, salt, baking soda, sugar, butter, egg, vanilla and Buttery Sweet Dough Flavor. Add 1/3 cup of the buttermilk.
3) Blend the mixture on medium speed for 2 minutes. The mixture will be thick at first, but will smooth out as you mix.
4) Add the remaining 1/3 cup buttermilk and mix on medium speed for 1 minute. Scrape the bottom and sides of the bowl, and mix briefly, if necessary.
5) Fill each well of the pan 2/3 full, and bake the cupcakes for 15 to 18 minutes, until they're light golden brown on the edges. Remove them from the oven, and immediately transfer them from the pan to a rack. Cool completely.
6) Combine all of the lemon curd ingredients in a pan on medium heat and stir well.
7) When curd starts to thicken, coats the back of a spoon, and starts to mound a bit as you stir, it's done. This will take anywhere from 4 to 10 minutes. The curd's temperature should have reached at least 185°F. Stir the curd one more time, spoon it into a storage container, and refrigerate until firm. (Extra curd keeps refrigerated for up to 3 weeks; freeze for longer storage.)
8) Core each cooled cupcake with a cupcake corer (or an apple corer), leaving a small well in the center of the cake. Fill to the brim with cooled lemon filling. Fill all cupcakes, then prepare the meringue.
9) To make the meringue: In a very clean work bowl, whip the egg whites and Bakewell Cream or cream of tartar until soft peaks form. Add the salt. Gradually add the sugar, increasing the whipping speed and continuing to whip until the mixture is light and billowy, and stiff peaks form.
10) Mound or pipe meringue onto each cupcake, then toast the meringue with a cook's torch; or carefully broil until golden brown. Serve warm, for a flowing lemon lava; or cool for a more set filling.
Makes 12 cupcakes.

Sunday, October 18

Green Chicken Chili Ramen

The last couple of weeks I've been craving something gingery for dinner. And as last night was the first frost warning of the season, it seemed like a great night to try to put something together with the fresh noodles I had sitting in the fridge and the finger of ginger I had purchased earlier in the week. Something soupy and hearty, perfectly suited to warm up on a cold night.

I spent a few minutes trying to figure out what ingredients I wanted to combine and in what order. I loosely based this recipe off the Wagamama Chili Beef Raman recipe I found and made last year (which is also very delicious!).

We had some garlic (and I mean GARLIC) haricot verts left over from dinner earlier in the week which I thought I could use up along with a small head of Napa cabbage I had recently purchased. Fresh cilantro ties the flavors together perfectly. So hence the name of Green Chicken Chili Ramen.

In the ingredient list you'll see ginger and garlic twice. It's not an error; there is some garlic & ginger used for the marinade and then some used in the base of the broth. I suppose you could simplify it and only add it at one place but I think that you get some more complexity of flavor having it layered. That part is totally up to you.

And of course, you can play with veg and spiciness to your tastes as well. Give it a try.

Green Chicken Chili Ramen

INGREDIENTS:
  • 1 lb. chicken (I use breasts or tenders because I prefer white meat)
  • 1-2 garlic cloves, grated
  • 2-3 garlic cloves, minced
  • 1 TBSP ginger, grated finely (I like to use a fine microplane)
  • 1 thumb-sized piece of ginger, minced
  • 4 TBSP teriyaki sauce
  • 2 TBSP oil
  • 1 shallot, thinly sliced
  • 1 small head Napa cabbage, shredded
  • 1 big handful haricot vert or green beans, diced or whole
  • 32 oz chicken broth
  • salt & pepper
  • 18 oz fresh or dried asian Noodles (I used something called "Chinese noodles" that I found in the refrigerated section at my grocery store, but this is a good list of different asian noodles that could work
  • 1 tsp red pepper flakes
  • 1-2 tsp sriracha sauce
  • 3-4 slices of jalapeno or other fresh chili
  • 1/4-1/2 bunch fresh cilantro, chopped
METHOD:
1) Marinate chicken in 1-2 grated garlic cloves, 1 TBSP grated ginger, and 4 TBSP teriyaki sauce
2) Add 2 TBSP oil to a dutch oven/pan you'll use for making the soup. Once heated, add chicken and marinade. Once cooked, take out chicken (cover & set aside), leaving any garlic & ginger in pan.
3) Add butter, sliced shallot, 2 minced garlic cloves and minced ginger. Saute for 3-5 minutes.
4) Add 3/4-1 small head of Napa cabbage that has been shredded/sliced and good handful haricot verts or green beans and saute until cabbage is slightly softened.
5) Add chicken stock and then salt, pepper, red pepper flake, sriracha, and optional chili pepper slices to taste. Bring to a boil.
6) Meanwhile make noodles according to directions on package & set aside.
7) Dice chicken that had been set aside and add it and the cilantro to soup. Check seasonings and make any adjustments. Simmer for 10 minutes.
8) Place noodles in bowl for serving. Top with soup. Garnish with more cilantro & enjoy.

Makes 4-6 servings.

Wednesday, September 16

Chicken Gyros & Tzatziki

When you want something fresh and healthy, a great choice is choosing the gyro. Often mispronounced (proper pronunciation here), it's a great way to get protein and vegetables. Served with tzatziki, a yogurt-based sauce, it's also full of flavor.
The word gyro literally translates to turn in Greek. Typically the dish is made of meat (usually beef, veal, mutton, pork, or chicken) cooked on a vertical rotisserie served in a pita with tomato, onion, and tzatziki sauce.

A couple months ago I discovered a gyro food truck near a job I was working. The next day I was on the web seeking out a gyro recipe to try at home. I don't have a rotisserie or spit on my grill so it needed to be something I could do easily.

I stumbled across Tide & Thyme's recipe and gave it ago. DELISH! I even followed her recipe for tzatziki. I've now made it a few times and really the only changes I've made is what I put into the sandwich. As you can see in the photo, I included some shredded red cabbage to the shredded lettuce, and omitted the cucumber since there was already a good amount in the tzatziki. I warmed the pita on the stove (as you would for tortillas for tacos) to help wake up the bread (you could even toss it on the grill for a couple seconds). The other trick I did was to tear off a square of foil and build the sandwich on it and then use it to roll the gyro up nice and tight. It makes eating it a lot easier, plus you get that food truck feel.

Listing this here for posterity, but check out Tide & Thyme's blog - there are some other great things there too!

Tide & Thyme's Chicken Gyros

INGREDIENTS:
  • 1 lb. chicken (I use breasts or tenders because I prefer white meat)
  • 3-4 garlic cloves, minced
  • 1 lemon, juiced
  • 2 tsp red wine vinegar
  • 2 tbsp olive oil
  • 2 tsp dried oregano
  • salt & pepper
  • tzatziki sauce
  • sliced tomatoes
  • shredded lettuce
  • shredded red cabbage (if desired)
  • sliced cucumber (if desired)
  • 4-6 pitas
METHOD:
1) Combine garlic, lemon juice, vinegar, olive oil, oregano, salt & pepper with whisk or fork in bowl or ziplock bag. Add chicken, thoroughly coat with marinade, and place in fridge to marinate for at least an hour.
2) Grill or cook in pan until browned and cooked through. After resting, slice into strips or shred.
3) Warm pita then top with chicken, tzatziki, and veggies.
4) Enjoy.

Makes 4-6 servings.

Tide & Thyme's Tzatziki Sauce

INGREDIENTS:
  • 1 32oz. container of plain greek yogurt
  • 2 regular cucumbers or 1 english cucumber, peeled & seeded
  • 2 tsp red wine vinegar
  • 3 garlic cloves, crushed (use a garlic press or microplane)
  • 1 tsp lemon juice
  • 1/2 tsp dried dill or fresh (I use fresh)
  • salt & pepper to taste
METHOD:
1) Shred or grate cucumber (I like to use my food processor). Then place them in a clean kitchen towel and squeeze to remove as much moisture as possible.
2) Mix yogurt, cucumber, garlic, vinegar, lemon juice, dill, salt & pepper together and refrigerate to let flavors blend together.
3) Enjoy. It makes a lot, but if you have leftover from gyros, it's a great dip for veggies too.

Monday, July 27

Pesto Chicken Orzo

I've been trying to bring my lunch to work and eat less frozen, packaged meals. Granted the ones I tend to eat are organic, GMO free, etc. But still. Cooking food gives me control of what I'm eating. Sunday as I was making my list for the grocery store this week, I tried to think about what would be good to bring. Pesto popped into my head, which it tends to do this time of year when the basil in the garden is abundant (I didn't make fresh pesto for this, instead I purchased some, but either works!)

I looked at Pinterest for some ideas and created my own dish that works hot or cold. Rather than cooking up chicken breasts, I "cheated" and grabbed one of the roast chickens from the store, which allowed me to simply pull off the white meat and not have to dirty another dish while cooking. Zucchini have looked good and are healthy and easy, so I picked up a few of those that were locally grown from the grocery store (mine have yet to produce more than flowers, so far). Mushrooms seemed like a nice pairing with the zucchini. And of course onion and garlic had to go in.

As I was cooking, I realized I had some shredded mozzarella and I added a handful of it which helped give the dish an almost risotto-like consistency. I kept the seasoning simple since pesto flavor was what I was after. I'll definitely even try this with rice as well. Because, pesto is good on EVERYTHING.

You can play with the veggies you include as well to suit your tastes or clean out your fridge.


Chicken Orzo Pesto

INGREDIENTS:
  • 1 cooked chicken, shredded or cut in bite size pieces (for this I got a oven-roasted one from the store to speed up time)
  • 3-4 medium zucchini cut in bite-size rounds
  • 1 package orzo
  • 1 medium onion, diced
  • 1- 1 1/2 cups mushrooms, sliced
  • 2-4 garlic cloves, diced
  • about 1/2 cup mozzarella, shredded (optional)
  • about 1/4 cup parmesan cheese, grated (optional)
  • 1 package (7oz) pesto (or make your own fresh)
  • 2-3 TBSP olive oil
  • salt & pepper to taste
METHOD:
1) Cook orzo according to box instructions/al dente.
2) When done, reuse pot. Add olive oil, onion, garlic. Saute until onion starts to soften.
3) Add garlic, mushrooms. Cook down a little.
4) Add zucchini, salt & pepper to taste, and cook until veggies are tender, browned and water is evaporated.
5) Turn off heat. Taste for seasoning & adjust as needed.
6) Add cooked orzo.
7) Add cheese. Stir.
8) Enjoy.

Makes 4-6 servings.


Sunday, June 14

Garlic scapes

Today I cut the first of the garlic scapes from the plants that were the first to emerge after a most snowy winter. They're huge and looking good. At one point about a month ago, I noticed some of the lower leaves of the garlic plants was looking a little yellow.

I did some research and found that it could be due to low nitrogen levels in the soil. So I got some bat guano to try which is very high in nitrogen. It seemed to work. I spread a small amount around the plants in the soil, used the edge of my trowel to turn it in a little and then watered.

Typically by now the leaves start to dry up and the garlic is ready for pulling. But, we had such a late spring here that I have a feeling we might not be pulling the garlic out until July this year.

Now that I have the scapes, Hubs wants to make some scape pesto. I've recently gotten him on the pesto wagon (finally!), and I'm sure they'll be delish.

Monday, March 9

Cupcake recipes on my "to try" list

I love these interesting flavors. Now I just need a reason to make them. Lemon Meringue Cupcakes reminds me that spring is coming. Tiramisu Cupcakes because I love coffee and chocolate. Snickerdoodle Cupcakes are inspired by one of my favorite cookie flavors. Smore's Cupcakes sound like they'd be great for upcoming BBQs. Samoa (aka Caramel Delights) Cupcakes because I've resisted buying Girl Scout Cookies for the past 3 weeks at the grocery store where they have a table set up. Emerald Isle Pistachio Cupcakes just in time for St. Patrick's Day. Butter Pecan Cupcakes inspired by one of my favorite ice cream flavors. Mmm.

Wednesday, February 25

Cooking Shows I'm Watching

While roasting some cauliflower and brussel sprouts I was watching WGBH Create and for the first time stumbled upon a show called The Victory Garden: Edible Feast. Now I grew up being tortured by my mom making me watch The Victory Garden with her. I really disliked it when I was a preteen and teenager. But as I got older I didn't mind it so much. The cooking segment was always more interesting to me than the flowers or whatever they were showing.

Today, I was excited to see another evolution of the show. This one combines Edible Magazines with The Victory Garden and the focus on is less about flowers and ornamentals and more about growing food and cooking it. I did a little digging and it seems to be two seasons in. Not bad. You can watch all the series on vimeo too. I started with Season 1, Episode and think I'll work my way through them in order while I burn some calories on the elliptical.


Another PBS series I highly recommend is Mind of a Chef, produced and narrated by Anthony Bourdain. In its third season, it's almost hypnotic to watch and some of the personalities that come forward from interviews or from the chefs highlighted are just fantastic. Prior seasons are on Netflix.

And of course, the one other show that I'm hooked on is The Great British Bake Off (yes in the US they changed the name to The Great British Baking Show (why??? I have no idea). Anyway, what we are seeing on PBS is the 6th season. I started to take a look and then realized that the final aired in the UK in the autumn, so I stopped to keep me from running into any spoilers. After the final next week, my goal is to see if I can track down any of the prior seasons to watch as well. Any tips or info is appreciated.

Wednesday, February 18

Cheesy Chicken & Broccoli Rice

A few weeks ago, broccoli at the supermarket looked great. I had to buy some. But then what to do with it? My hubs only likes it if it's smothered in cheese. And that got me to thinking about broccoli & cheese with rice and chicken for some protein. Topped with a crust that provides a little crunch in contrast to the savory cheesy center.

In my head it sounded more simple but when I made it it did take a bit because all the pieces need to be cooked together. If I figure out a more efficient way to cook everything, I'll definitely update this recipe. But it's good, freezes well and is worth sharing now. Plus, if you do some of the parts in stages, it's totally manageable.


Cheesy Chicken & Broccoli Rice

INGREDIENTS:
  • 1-1 1/2 pounds of chicken, cut in bite size pieces
  • 1-1 1/2 pounds broccoli (fresh or frozen), cut in bite size pieces (could also mix with roasted cauliflower)
  • 1 1/2-2 cups uncooked rice
  • 1 medium onion, diced
  • 2-4 garlic cloves, diced
  • 1 cup cheddar cheese, shredded
  • 1-2 TBSP flour
  • 1 tsp dried oregano
  • 2 tsp mustard powder
  • 1 TBSP djon mustard
  • 1/4-1/2 cup milk (add a little at a time until consistency reached)
  • 2 TBSP butter
  • salt & pepper to taste
METHOD:
1) Boil broccoli in water until cooked and tender.
2) Start water to boil in another pan for rice. Once at a boil follow instructions on package.
3) In another pan (do this while broccoli cooks), add butter, onion and garlic. Saute until fragrant.
4) Add chicken and brown (doesn't have to cook all the way through).
5) Add oregano, salt, pepper, mustard powder, and djon mustard and stir well to coat.
6) Sprinkle flour over everything and stir well until combined.
7) Add cheese. Stir.
8) Add milk a little at a time until a good consistency forms for the cheese sauce.
9) When broccoli is done, drain it and set aside in large bowl.
10) When rice is done, add to same bowl as broccoli.
10) Add chicken and cheese sauce to broccoli and rice, then stir well to combine.
11) Pour/place mixture into 13x9 casserole dish.
12) Top with grated parmesan or pecorino romano and breadcrumbs. (can also add French's onions, etc)
13) Bake at 350F for 20 minutes.

Makes 6-8 servings.

Monday, February 16

Kale, Garlic & Bacon

How depressing that it's nearly been a year since I last posted. What a shame. Things got busy I guess and I just never got around to getting some things posted.

Anyway, let's work on fixing this.

We've been battling feet of snow this winter here in the Greater Boston area. And I've been trying a few new recipes. Lately I've been using more kale. Yes, it's a superfood and all that. But I've also been trying to find other ways to incorporate it.

One simple way is to use it in salad and mix it with romaine or other greens. Just make sure to remove the thick stems.

Another idea I had was to make it into something akin to a collard greens type of dish. Garlic, caramelized onion and bacon come together for a lip-smacking delicious side that elevates the kale from something nutritious to something delicious.


Kale, Garlic & Bacon


INGREDIENTS:
  • 1-2 bunches of kale, leaves only, no thick stems
  • 3 slices bacon, cooked and then crumbled (you can be fancy and use pancetta)
  • 5-8 cloves garlic
  • 1/2 large red onion, thinly sliced in half moon pieces
  • 1-2 TBSP balsamic vinegar
  • Peperoncino or red pepper flakes - pinch or to taste
  • salt
  • pepper

METHOD:
1) Cook bacon. (When I made this I had cooked about 10 slices, some of which were consumed for breakfast).
2) When bacon is done, take it out of the oil and place on paper towels or paper to drain.
3) While bacon drippings are still hot, add onion and saute until transparent. You might need to add a little oil (olive or vegetable).
4) Then add bacon and garlic and saute until fragrant.
5) Add kale, a handful at a time. Stir once the kale on the bottom starts to wilt.
6) Add salt, pepper, peperoncino and balsamic vinegar.
7) Cook until all kale is sauted and tender to your taste, about 20 minutes, stirring occasionally.

Eat it as a side or use it to dress up a sandwich like below. YUM!
A photo posted by Jane G (@caff) on

Tuesday, April 29

Enchiladas with Ramps and Fiddlehead Ferns

Sundays we tend to do some cooking for the week. Hubs made a meat pasta sauce and I made my enchilada bake. I had purchased some dried chilies and wanted to use them so I made up my own enchilada sauce for it.
Making enchilada sauce. Red onion, garlic, dried Guajillo and Pasilla chiles and the water they soaked in, jalapeƱo, parsley, cilantro, tomato, tomato paste, shot of vinegar, cumin, salt, and pepper. I made the enchilada recipe with ground beef instead of chicken but you can find the recipe here.

I served the enchilada with spring goodies found at Whole Foods - fiddleheads and ramps.

Enchilada casserole topped with sour cream and avocado, served with fiddlehead ferns and ramps sautƩed in garlic butter.

Saturday, April 26

Sour Cream Belgian Waffles

Woke up too early for a Saturday morning, with a sick puppy. After dealing with the drama, cleaning up, and enjoying some coffee, I decided we deserved a nice breakfast. Our weekends have been busy and we've been doing simple cereal, toast, etc. I knew there was some sour cream in the fridge to use up so, I investigated the interwebs for a recipe to try. I landed on a slightly adapted version from The Joy of Cooking. It's absolutely delicious and will now be my go-to for waffles. Give it a try.

Sour Cream Waffles

INGREDIENTS
  • 1 cup flour (all-purpose or cake flour)
  • 1 1/2 tsp. baking powder
  • 1 tsp. sugar
  • 1 tsp. baking soda
  • 1-2 tsp. of vanilla extract
  • Dash of salt
  • 3 eggs, separated
  • 2 cups sour cream
  • Dash of milk (if needed for consistency of batter)
1) Preheat waffle iron.
2) In medium mixing bowl, whisk together flour, baking powder, salt, sugar, and baking soda.
3) In a small bowl, mix egg yolks, sour cream and vanilla until smooth, then whisk into dry ingredients.
5) Beat egg whites until stiff, but not dry. Stir about 1/3 of the egg whites into sour cream mixture at a time, gently folding to combine.
6) Bake according to waffle iron directions. Serve immediately; they will soften as they stand. You can also keep them warm in a 170F oven. Top with maple syrup, roasted & chopped nuts, berries, etc. Makes 4 Belgian waffles.

Thursday, April 3

Asparagus, Pea, and Cannelloni Bean Pasta


I love creamy pasta sauces, but they're not the healthiest. Plus, they can be very rich to boot.

After watching a few cooking shows recently that featured pureed beans, I was inspired to try using them to create a thick, rich, and creamy sauce to use on pasta.

Last night I decided to see if my idea would work out as I hoped. I debated between mashing the beans and whizzing them up in the food processor with the garlic and cheese. I ended up opting for mashing, but next time I might try whizzing, just to see what the difference will be.

The good news is that the result was amazingly delicious. And, it is a good source of protein and minerals. Bonus!

It's a quick, simple recipe to put together. It also can be enjoyed without the pasta. I was originally going to add chicken but our vegetarian cousin was visiting so it got left out. You definitely could add it in, but you certainly do not need it.

Asparagus, Pea, and Cannelloni Bean Pasta

INGREDIENTS:
  • 8 oz. peas (fresh or frozen)
  • 1 bunch asparagus, diced into bite sized pieces (close in size to peas)
  • 1 onion, diced
  • 4-6 garlic cloves, minced
  • 1 15.5 oz. can of cannelloni/white beans, roughly mashed with fork
  • 1 package spaghetti or linguine
  • 1 cup reserved pasta water
  • 1/4 cup shredded mozzarella cheese
  • 1/4 cup grated Romano or Parmigiano-Reggiano cheese
  • 4 TBSP butter (more or less)
  • 1 TBSP dried oregano
  • 1 TBSP fresh basil (can also use dried)
  • pinch red pepper flakes
  • salt & pepper to taste
  • OPTIONAL: <a href="http://www.fullmeasureofhappiness.com/2011/10/12/oven-roasted-tomatoes/">oven-dried tomatoes</a>, diced to garnish
METHOD:
1) In saute pan, add 1 TBSP of butter and let it melt. Once melted and starting to foam, add diced onion and saute on medium or medium high heat until softened and starting to get some good brown color - about 10 minutes.
2) Heat water in pot for pasta and bring to boil. Once boiling, follow package instructions. Be sure to salt your water.
3) Add diced asparagus and peas. Stir well.
4) Add oregano, basil, pepper flakes.
5) Add mashed beans 3 TBSP of butter, stir, then add garlic.
6) Add mozzarella and Romano or Parmesan cheeses. Stir well until incorporated evenly.
7) Slowly add pasta water bit by bit to thin out bean/cheese mixture to a consistency that will coat pasta. You might not need all 1 cup of it. Do this to your preference. Just go slow. You can always add more water, but you can't take it away.
8) Add salt and pepper to taste.
9) Serve over cooked pasta or eat it by itself.

Sadly there's not plated photo for you to see because we were hungry and devoured it before I got the chance. Oops. Maybe next time I make it I'll try to remember to snap a pic.

Wednesday, February 5

Tacos & Taco Baked Sweet Potato

The other night we, well I, made tacos for dinner. After getting two dinners out of it, there was just a little bit left over. So today for lunch I whipped up this Taco Baked Sweet Potato for lunch before going out and attempting to tackle the inches of snow.

Taco Recipe

INGREDIENTS
  • 1 lb (+/-) Ground beef, turkey, pork, or chicken (note: if using poultry, you'll want to up the seasoning a little as they tend to be less flavorful)
  • 1 medium sized green bell pepper
  • 1 medium-sized red bell pepper
  • 1 jalapeƱo or poblano chile - if you want it more mild, remove seeds and any white on the inside.
  • 1 medium or large onion (white/sweet/red - all are good), diced
  • 3-6 garlic cloves, minced (add as much or as little as you like, I like a lot)
  • 2 TBSP oil (of your choosing, I usually use veg or olive)
  • 1 packet Goya culantro y achiote - OPTIONAL. You can also read up on ways to make a substitute seasoning in this thread
SEASONINGS
  • 2 TBSP chili powder
  • 2 TBSP ground cumin
  • 1 TBSP garlic powder
  • 1 TBSP onion powder
  • 1/2 TBSP dried oregano
  • 1-2 bay leaves
  • Salt & pepper to taste
FOR SERVING
  • Chopped lettuce (for serving)
  • Chopped tomato (for serving)
  • Avocado slices (for serving)
  • Tortillas - corn or flour, slightly warmed (for serving)
  • Shredded cheese (for serving)
  • Sour cream (for serving)
1) Heat pan with oil. Add onion, stir to coat with oil. Add all of the seasonings. Stir to make sure all onion is coated evenly.
2) Add bell peppers and hot pepper. Stir. Let cook 5 minutes until vegetables are softened.
3) Add meat and garlic. Mix well with veggies, so that they are all well combined. This will help flavor your meat.
4) Once meat is cooked through, taste to check for seasoning.
5) Warm tortillas. If you have a gas stove, you can just set them on the burner to toast - BUT KEEP YOUR EYE ON THEM. Should only take about 1 minute per side.
6) Fill up your tortilla how you like it and enjoy!

Taco Baked Sweet Potato

1) Poke sweet potato with fork.
2) Place sweet potato in microwave. Zap until cooked through. Let rest.
3) Reheat leftover taco meat.
4) Cut a slit in sweet potato. Using a fork, smash and fluff the center.
5) Top with taco meat, a little shredded cheese.
6) Microwave until cheese is melted.
7) Top with your favorite fixin's.

Sunday, September 15

Thai Chili Peppers

This is the first year we grew Thai Chili Peppers. They seemed to do well. To preserve them, you can dry them and also freeze them whole.

Thursday, July 11

Tuesday, June 25

Extend your picked herbs

Use the glass part of your french press to store and extend fresh herbs from the garden. Add enough water to cover the cut stems.

These are almost a week old. If it's super hot you can also put it in the fridge.


Thursday, October 27

Ginger Crack Cookies

My friend Meesh introduced me to these yummy little gems. I will even give her credit for renaming these from Ginger Crackle Cookies. They are super addictive. And, after being out quite a bit on vacation this month, I decided to whip up a batch to bring into the office upon my return.

If you like spicy, molasses-y cookies, these puppies are for you. 

This recipe makes a few dozen (3-4 I think), but you can freeze the dough. Get to the point where you've rolled them into balls. Place the rolled balls on a cookie sheet and slip it into the freezer. Once they are frozen, you can put them into a freezer bag and back into the freezer. Then just pluck them out and bake at your whim.

Ingredients
3 3/4 cups sifted flour (can use wheat flour too)
3 tsp ground ginger
1 1/2 tsp baking soda (if you use baking powder, like I did by mistake once, it comes out less crackled and poofier)
1/2 tsp cinnamon
1/2 tsp salt
1/4 tsp ground cloves

3/4 cups butter
2 cups sugar
2 eggs, beaten
1/2 cup molasses
1 TBSP cider vinegar

Directions
Preheat oven to 325F.

Sift together flour, ground ginger, baking soda, cinnamon, salt and ground cloves.

Cream together butter and sugar. Add eggs, one at a time and beating well. Add molasses and cider vinegar. Blend well.

Add the flour mixture into the wet ingredients. Form into 3/4 to 1 inch balls and roll in granulated sugar. 

Bake at 325F for 10-12 minutes or until the tops just start to crack. 

NOTE: DO NOT OVERCOOK, THE COOKIES WILL BE ROCK HARD IF YOU DO.

Tuesday, October 25

Apple Crisp

Apple Crisp ready to bake
Ah Fall. It's my favorite time of year. Warm days with crisp nights. Pumpkins, apples and changing leaves. What's not to love?

Over the weekend, we went apple picking. I was actually surprised at the variety of apples still available, considering it's a bit late in the season.

Never the less, we were able to easily fill our peck bag with Cortlands, Macouns, Empires, Mutsus, Mac Spur and a few others. Of course we snacked as we picked, one of the fun things about apple picking. You have to taste them as you go, right? ;)

With a mix of fresh eating apple varities and enough that do well for baking, we brought our mini-hoard home. I opted to make a apple crisp that was mighty delicious.

sd

Ingredients 
10 cups all-purpose apples, peeled, cored and sliced
1 cup white sugar
1 tablespoon all-purpose flour
1 teaspoon ground cinnamon
1/2 cup water

1 cup quick-cooking oats (I didn't have any so I used crushed Special K, worked great)
1 cup all-purpose flour
1 cup packed brown sugar
1/4 teaspoon baking powder
1/4 teaspoon baking soda
1/2 cup butter, melted

Directions
Preheat oven to 350 degrees F (175 degree C). Place the sliced apples in a 9x13 inch pan. Mix the white sugar, 1 tablespoon flour and ground cinnamon together, and sprinkle over apples. Pour water evenly over all. Combine the oats, 1 cup flour, brown sugar, baking powder, baking soda and melted butter together. Crumble evenly over the apple mixture. Bake at 350 degrees F (175 degrees C) for about 45 minutes.

Serve: with vanilla ice cream.

YUM!

ShareThis

Related Posts Plugin for WordPress, Blogger...